Layout Containers
While many GUI toolkits require you to precisely place widgets in a window, using absolute positioning, GTK+ uses a different approach. Rather than specifying the position and size of each widget in the window, you can arrange your widgets in rows, columns, and/or tables. The size of your window can be determined automatically, based on the sizes of the widgets it contains. And the sizes of the widgets are, in turn, determined by the amount of text they contain, or the minimum and maximum sizes that you specify, and/or how you have requested that the available space should be shared between sets of widgets. You can perfect your layout by specifying padding distance and centering values for each of your widgets. GTK+ then uses all this information to resize and reposition everything sensibly and smoothly when the user manipulates the window.
GTK+ arranges widgets hierarchically, using containers.
They are invisible to the end user and are inserted into a window, or placed
within each other to layout components.
There are two flavours of containers: single-child
containers, which are all descendants of Gtk.Bin, and multiple-child
containers, which are descendants of Gtk.Container.
The most commonly used are vertical or horizontal boxes
(Gtk.Box) and grids (Gtk.Grid).
Boxes
Boxes are invisible containers into which we can pack our widgets.
When packing widgets into a horizontal box, the objects are inserted
horizontally from left to right or right to left depending on whether
Gtk.Box.pack_start() or Gtk.Box.pack_end() is used.
In a vertical box, widgets are packed from top to bottom or vice versa.
You may use any combination of boxes inside or beside other boxes to create
the desired effect.
Example
Let’s take a look at a slightly modified version of the extended example with two buttons.

1 2 3 4 5 6 7 8 9 10 11 12 13 14 15 16 17 18 19 20 21 22 23 24 25 26 27 28 29 30 31 32 33 34 35 36 37 38 39 | #!/usr/bin/gjs
const Gtk = imports.gi.Gtk;
const Lang = imports.lang;
Gtk.init(null);
const MyWindow = new Lang.Class({
Name: 'MyWindow',
Extends: Gtk.Window,
_init: function() {
this.parent({title:"Hello World"});
this.box = new Gtk.Box({spacing: 6});
this.add(this.box);
this.button1 = new Gtk.Button({label: "Hello"});
this.button1.connect("clicked", this.onButton1Clicked);
this.box.pack_start(this.button1, true, true, 0);
this.button2 = new Gtk.Button({label: "Goodbye"});
this.button2.connect("clicked", this.onButton2Clicked);
this.box.pack_start(this.button2, true, true, 0);
},
onButton1Clicked: function(widget) {
print("Hello");
},
onButton2Clicked: function(widget) {
print("Goodbye");
}
});
let win = new MyWindow();
win.connect("delete-event", Gtk.main_quit);
win.show_all();
Gtk.main();
|
First, we create a horizontally orientated box container where 6 pixels are placed between children. This box becomes the child of the top-level window.
15 16 | this.box = new Gtk.Box({spacing: 6});
this.add(this.box);
|
Subsequently, we add two different buttons to the box container.
18 19 20 21 22 23 24 | this.button1 = new Gtk.Button({label: "Hello"});
this.button1.connect("clicked", this.onButton1Clicked);
this.box.pack_start(this.button1, true, true, 0);
this.button2 = new Gtk.Button({label: "Goodbye"});
this.button2.connect("clicked", this.onButton2Clicked);
this.box.pack_start(this.button2, true, true, 0);
|
While with Gtk.Box.pack_start() widgets are positioned from left to right,
Gtk.Box.pack_end() positions them from right to left.
Grid
Gtk.Grid is a container which arranges its child widgets in rows and
columns, but you do not need to specify the dimensions in the constructor.
Children are added using Gtk.Grid.attach(). They can span multiple rows or
columns. It is also possible to add a child next to an existing child, using
Gtk.Grid.attach_next_to().
Gtk.Grid can be used like a Gtk.Box by just using
Gtk.Grid.add(), which will place children next to each other in the
direction determined by the “orientation” property (defaults to
Gtk.Orientation.HORIZONTAL).
Example
1 2 3 4 5 6 7 8 9 10 11 12 13 14 15 16 17 18 19 20 21 22 23 24 25 26 27 28 29 30 31 32 33 34 35 36 37 | #!/usr/bin/gjs
const Gtk = imports.gi.Gtk;
const Lang = imports.lang;
Gtk.init(null);
const GridWindow = Lang.Class({
Name: 'GridWindow',
Extends: Gtk.Window,
_init: function() {
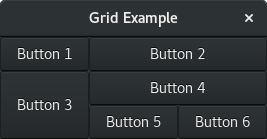
this.parent({title: "Grid Example"});
let grid = new Gtk.Grid();
this.add(grid);
let button1 = new Gtk.Button({label: "Button 1"});
let button2 = new Gtk.Button({label: "Button 2"});
let button3 = new Gtk.Button({label: "Button 3"});
let button4 = new Gtk.Button({label: "Button 4"});
let button5 = new Gtk.Button({label: "Button 5"});
let button6 = new Gtk.Button({label: "Button 6"});
grid.add(button1);
grid.attach(button2, 1, 0, 2, 1);
grid.attach_next_to(button3, button1, Gtk.PositionType.BOTTOM, 1, 2);
grid.attach_next_to(button4, button3, Gtk.PositionType.RIGHT, 2, 1);
grid.attach(button5, 1, 2, 1, 1);
grid.attach_next_to(button6, button5, Gtk.PositionType.RIGHT, 1, 1);
}
});
let win = new GridWindow();
win.connect("delete-event", Gtk.main_quit);
win.show_all();
Gtk.main();
|
ListBox
A Gtk.ListBox is a vertical container that contains Gtk.ListBoxRow
children. These rows can by dynamically sorted and filtered, and headers can be
added dynamically depending on the row content. It also allows keyboard and
mouse navigation and selection like a typical list.
Using Gtk.ListBox is often an alternative to Gtk.TreeView, especially
when the list contents has a more complicated layout than what is allowed by a
Gtk.CellRenderer, or when the contents is interactive (i.e. has a button
in it).
Although a Gtk.ListBox must have only Gtk.ListBoxRow children you can
add any kind of widget to it via Gtk.Container.add(), and a
Gtk.ListBoxRow widget will automatically be inserted between the list and
the widget.
Example
1 2 3 4 5 6 7 8 9 10 11 12 13 14 15 16 17 18 19 20 21 22 23 24 25 26 27 28 29 30 31 32 33 34 35 36 37 38 39 40 41 42 43 44 45 46 47 48 49 50 51 52 53 54 55 56 57 58 59 60 61 62 63 64 65 66 67 68 69 70 71 72 73 74 75 76 77 78 79 80 81 82 83 84 85 86 87 88 89 90 91 92 93 94 95 96 97 98 99 100 101 | #!/usr/bin/gjs
const Gtk = imports.gi.Gtk;
const Lang = imports.lang;
Gtk.init(null);
const ListBoxRowWithData = Lang.Class({
Name: "ListBoxRowWithData",
Extends: Gtk.ListBoxRow,
_init: function(data) {
this.parent();
this.data = data;
this.add(new Gtk.Label({label: data}));
}
});
const ListBoxWindow = Lang.Class({
Name: "ListBoxWindow",
Extends: Gtk.Window,
_init: function() {
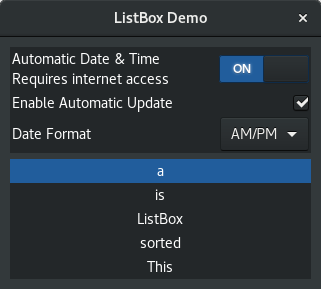
this.parent({title: "ListBox Demo"});
this.border_width = 10;
let box_outer = new Gtk.Box({orientation: Gtk.Orientation.VERTICAL, spacing: 6});
this.add(box_outer);
let listbox = new Gtk.ListBox();
listbox.selection_mode = Gtk.SelectionMode.NONE;
box_outer.pack_start(listbox, true, true, 0);
let row = new Gtk.ListBoxRow();
let hbox = new Gtk.Box({orientation: Gtk.Orientation.HORIZONTAL, spacing: 50});
row.add(hbox);
let vbox = new Gtk.Box({orientation: Gtk.Orientation.VERTICAL});
hbox.pack_start(vbox, true, true, 0);
let label1 = new Gtk.Label({label: "Automatic Date & Time", xalign: 0});
let label2 = new Gtk.Label({label: "Requires internet access", xalign: 0});
vbox.pack_start(label1, true, true, 0);
vbox.pack_start(label2, true, true, 0);
let swtch = new Gtk.Switch();
swtch.valign = Gtk.Align.CENTER;
hbox.pack_start(swtch, false, true, 0);
listbox.add(row);
row = new Gtk.ListBoxRow();
hbox = new Gtk.Box({orientation: Gtk.Orientation.HORIZONTAL, spacing: 50});
row.add(hbox);
let label = new Gtk.Label({label: "Enable Automatic Update", xalign: 0});
let check = new Gtk.CheckButton();
hbox.pack_start(label, true, true, 0);
hbox.pack_start(check, false, true, 0);
listbox.add(row);
row = new Gtk.ListBoxRow();
hbox = new Gtk.Box({orientation: Gtk.Orientation.HORIZONTAL, spacing: 50});
row.add(hbox);
label = new Gtk.Label({label: "Date Format", xalign: 0});
let combo = new Gtk.ComboBoxText();
combo.insert(0, "0", "24-hour");
combo.insert(1, "1", "AM/PM");
hbox.pack_start(label, true, true, 0);
hbox.pack_start(combo, false, true, 0);
listbox.add(row);
let listbox2 = new Gtk.ListBox();
let items = "This is a sorted ListBox Fail".split(' ');
items.forEach(
item => listbox2.add(new ListBoxRowWithData(item))
);
let sortFunc = function(row1, row2, data, notifyDestroy) {
return row1.data.toLowerCase() > row2.data.toLowerCase();
};
let filterFunc = function(row, data, notifyDestroy) {
return (row.data != 'Fail');
};
listbox2.set_sort_func(sortFunc, null, false);
listbox2.set_filter_func(filterFunc, null, false);
listbox2.connect("row-activated", (widget, row) => print(row.data));
box_outer.pack_start(listbox2, true, true, 0);
listbox2.show_all();
}
});
let win = new ListBoxWindow();
win.connect("delete-event", Gtk.main_quit);
win.show_all();
Gtk.main();
|
Stack and StackSwitcher
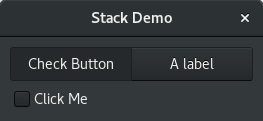
A Gtk.Stack is a container which only shows one of its children at a
time. In contrast to Gtk.Notebook, Gtk.Stack does not provide
a means for users to change the visible child. Instead, the
Gtk.StackSwitcher widget can be used with Gtk.Stack to
provide this functionality.
Transitions between pages can be animated as slides or fades. This can be
controlled with Gtk.Stack.set_transition_type(). These animations respect
the “gtk-enable-animations” setting.
Transition speed can be adjusted with Gtk.Stack.set_transition_duration()
The Gtk.StackSwitcher widget acts as a controller for a
Gtk.Stack; it shows a row of buttons to switch between the various
pages of the associated stack widget.
All the content for the buttons comes from the child properties of the
Gtk.Stack.
It is possible to associate multiple Gtk.StackSwitcher widgets with
the same Gtk.Stack widget.
Example
1 2 3 4 5 6 7 8 9 10 11 12 13 14 15 16 17 18 19 20 21 22 23 24 25 26 27 28 29 30 31 32 33 34 35 36 37 38 39 40 | #!/usr/bin/gjs
const Gtk = imports.gi.Gtk;
const Lang = imports.lang;
Gtk.init(null);
const StackWindow = Lang.Class({
Name: "StackWindow",
Extends: Gtk.Window,
_init: function() {
this.parent({title: "Stack Demo"});
this.border_width = 10;
let vbox = new Gtk.Box({orientation: Gtk.Orientation.VERTICAL, spacing: 6});
this.add(vbox);
let stack = new Gtk.Stack();
stack.transition_type = Gtk.StackTransitionType.SLIDE_LEFT_RIGHT;
stack.transition_duration = 1000;
let checkbutton = new Gtk.CheckButton({label: "Click Me"});
stack.add_titled(checkbutton, "check", "Check Button");
let label = new Gtk.Label();
label.markup = "<big>A fancy label</big>";
stack.add_titled(label, "label", "A label");
let stackSwitcher = new Gtk.StackSwitcher();
stackSwitcher.stack = stack;
vbox.pack_start(stackSwitcher, true, true, 0);
vbox.pack_start(stack, true, true, 0);
}
});
let win = new StackWindow();
win.connect("delete-event", Gtk.main_quit);
win.show_all();
Gtk.main();
|
HeaderBar
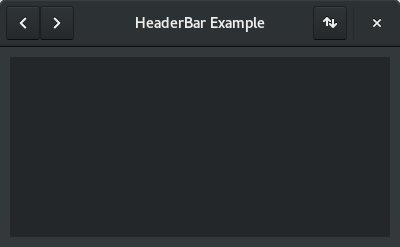
A Gtk.HeaderBar is similar to a horizontal Gtk.Box, it allows
to place children at the start or the end. In addition, it allows a title to be
displayed. The title will be centered with respect to the width of the box,
even if the children at either side take up different amounts of space.
Since GTK+ now supports Client Side Decoration, a Gtk.HeaderBar can
be used in place of the title bar (which is rendered by the Window Manager).
A Gtk.HeaderBar is usually located across the top of a window and
should contain commonly used controls which affect the content below. They also
provide access to window controls, including the close window button and window
menu.
Example
1 2 3 4 5 6 7 8 9 10 11 12 13 14 15 16 17 18 19 20 21 22 23 24 25 26 27 28 29 30 31 32 33 34 35 36 37 38 39 40 41 42 43 44 45 46 47 48 | #!/usr/bin/gjs
const Gtk = imports.gi.Gtk;
const Gio = imports.gi.Gio;
const Lang = imports.lang;
Gtk.init(null);
const HeaderBarWindow = Lang.Class({
Name: "HeaderBarWindow",
Extends: Gtk.Window,
_init: function() {
this.parent({title: "HeaderBar Demo"});
this.set_border_width(10);
this.set_default_size(400, 200);
let hb = new Gtk.HeaderBar();
hb.set_show_close_button(true);
hb.set_title("HeaderBar Example");
this.set_titlebar(hb);
let button = new Gtk.Button();
let icon = new Gio.ThemedIcon({name: "mail-send-receive-symbolic"});
let image = Gtk.Image.new_from_gicon(icon, Gtk.IconSize.BUTTON);
button.add(image);
hb.pack_end(button);
let box = new Gtk.Box({orientation: Gtk.Orientation.HORIZONTAL});
button = new Gtk.Button();
button.add(new Gtk.Arrow({arrow_type: Gtk.ArrowType.LEFT, shadow_type: Gtk.ShadowType.NONE}));
box.add(button);
button = new Gtk.Button();
button.add(new Gtk.Arrow({arrow_type: Gtk.ArrowType.RIGHT, shadow_type: Gtk.ShadowType.NONE}));
box.add(button);
hb.pack_start(box);
this.add(new Gtk.TextView());
}
});
let win = new HeaderBarWindow();
win.connect("delete-event", Gtk.main_quit);
win.show_all();
Gtk.main();
|
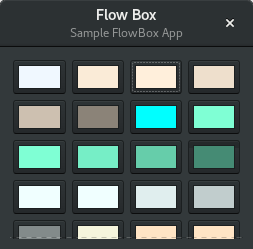
FlowBox
A Gtk.FlowBox is a container that positions child widgets in sequence
according to its orientation.
For instance, with the horizontal orientation, the widgets will be arranged from left to right, starting a new row under the previous row when necessary. Reducing the width in this case will require more rows, so a larger height will be requested.
Likewise, with the vertical orientation, the widgets will be arranged from top to bottom, starting a new column to the right when necessary. Reducing the height will require more columns, so a larger width will be requested.
The children of a Gtk.FlowBox can be dynamically sorted and filtered.
Although a Gtk.FlowBox must have only Gtk.FlowBoxChild
children, you can add any kind of widget to it via Gtk.Container.add(),
and a Gtk.FlowBoxChild widget will automatically be inserted between
the box and the widget.
Example
1 2 3 4 5 6 7 8 9 10 11 12 13 14 15 16 17 18 19 20 21 22 23 24 25 26 27 28 29 30 31 32 33 34 35 36 37 38 39 40 41 42 43 44 45 46 47 48 49 50 51 52 53 54 55 56 57 58 59 60 61 62 63 64 65 66 67 68 69 70 71 72 73 74 75 76 77 78 79 80 81 82 83 84 85 86 87 88 89 90 91 92 93 94 95 96 97 98 99 100 101 102 103 104 105 106 107 108 109 110 111 112 113 114 115 116 117 118 119 120 121 122 | #!/usr/bin/gjs
const Gtk = imports.gi.Gtk;
const Gdk = imports.gi.Gdk;
const Lang = imports.lang;
Gtk.init(null);
const FlowBoxWindow = Lang.Class({
Name: "FlowBoxWindow",
Extends: Gtk.Window,
_init: function() {
this.parent({title: "FlowBox Demo"});
this.set_border_width(10);
this.set_default_size(300, 250);
let header = new Gtk.HeaderBar({title: "Flow Box"});
header.set_subtitle("Sample FlowBox App");
header.set_show_close_button(true);
this.set_titlebar(header);
let scrolled = new Gtk.ScrolledWindow();
scrolled.set_policy(Gtk.PolicyType.NEVER, Gtk.PolicyType.AUTOMATIC);
let flowbox = new Gtk.FlowBox();
flowbox.set_valign(Gtk.Align.START);
flowbox.set_max_children_per_line(30);
flowbox.set_selection_mode(Gtk.SelectionMode.NONE);
this.createFlowbox(flowbox);
scrolled.add(flowbox);
this.add(scrolled);
},
colorSwatchNew: function(strColor) {
let rgba = new Gdk.RGBA();
rgba.parse(strColor);
let button = Gtk.ColorButton.new_with_rgba(rgba);
return button;
},
createFlowbox: function(flowbox) {
let colors = [
'AliceBlue',
'AntiqueWhite',
'AntiqueWhite1',
'AntiqueWhite2',
'AntiqueWhite3',
'AntiqueWhite4',
'aqua',
'aquamarine',
'aquamarine1',
'aquamarine2',
'aquamarine3',
'aquamarine4',
'azure',
'azure1',
'azure2',
'azure3',
'azure4',
'beige',
'bisque',
'bisque1',
'bisque2',
'bisque3',
'bisque4',
'black',
'BlanchedAlmond',
'blue',
'blue1',
'blue2',
'blue3',
'blue4',
'BlueViolet',
'brown',
'brown1',
'brown2',
'brown3',
'brown4',
'burlywood',
'burlywood1',
'burlywood2',
'burlywood3',
'burlywood4',
'CadetBlue',
'CadetBlue1',
'CadetBlue2',
'CadetBlue3',
'CadetBlue4',
'chartreuse',
'chartreuse1',
'chartreuse2',
'chartreuse3',
'chartreuse4',
'chocolate',
'chocolate1',
'chocolate2',
'chocolate3',
'chocolate4',
'coral',
'coral1',
'coral2',
'coral3',
'coral4'
];
colors.forEach(
color => flowbox.add(this.colorSwatchNew(color))
);
}
});
let win = new FlowBoxWindow();
win.connect("delete-event", Gtk.main_quit);
win.show_all();
Gtk.main();
|
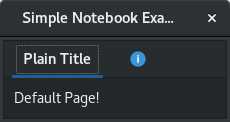
Notebook
The Gtk.Notebook widget is a Gtk.Container whose children are pages that can be switched between using tab labels along one edge.
There are many configuration options for GtkNotebook. Among other things, you
can choose on which edge the tabs appear (see Gtk.Notebook.set_tab_pos()),
whether, if there are too many tabs to fit the notebook should be made bigger or
scrolling arrows added (see Gtk.Notebook.set_scrollable(), and whether
there will be a popup menu allowing the users to switch pages (see
Gtk.Notebook.popup_enable(), Gtk.Notebook.popup_disable()).
Example
1 2 3 4 5 6 7 8 9 10 11 12 13 14 15 16 17 18 19 20 21 22 23 24 25 26 27 28 29 30 31 32 33 34 35 36 37 | #!/usr/bin/gjs
const Gtk = imports.gi.Gtk;
const Lang = imports.lang;
Gtk.init(null);
const MyWindow = Lang.Class({
Name: "MyWindow",
Extends: Gtk.Window,
_init: function() {
this.parent({title: "Simple Notebook Example"});
this.border_width = 3;
this.notebook = new Gtk.Notebook();
this.add(this.notebook);
this.page1 = new Gtk.Box();
this.page1.border_width = 10;
this.page1.add(new Gtk.Label({label: "Default Page!"}));
this.notebook.append_page(this.page1, new Gtk.Label({label: "Plain Title"}));
this.page2 = new Gtk.Box();
this.page2.border_width = 10;
this.page2.add(new Gtk.Label({label: "A page with an image for a title."}));
this.notebook.append_page(
this.page2,
Gtk.Image.new_from_icon_name("help-about", Gtk.IconSize.MENU)
);
}
});
let win = new MyWindow();
win.connect("delete-event", Gtk.main_quit);
win.show_all();
Gtk.main();
|